Patrode is a dish from Mangalore (a major city and the headquarters of Dakshina Kannada) and something I have grown up eating. A spicy batter is made by grinding rice, dal, spices, tamarind, jaggery and red chilli. This batter is smeared on the colocasia leaves (also called taro/eddoe/arbi), which are rolled and steamed and/or fried.
It is interesting to know that the primary use of colocasia is the consumption of its edible corm and leaves. In its raw form, the plant is toxic due to the presence of calcium oxalate and the presence of needle-shaped crystals called raphides in the plant cells. However, the toxin can be destroyed and the tuber rendered palatable by cooking or by steeping in cold water overnight. In patrode preparation, a generous amount of tamarind is added to reduce the itchiness of the colocasia leaves.
Patrode is one of my most favourite traditional dishes but I never imagined making it myself. A few reasons are because the colocasia leaves are so darn hard to find and the preparation of this dish is time consuming, messy and has to be prepared properly to prevent any potential itchiness of the tongue and throat by the leaves. Every time I visit India, my mom and MIL go out of their way to make sure that I get a year's worth of patrode so I that won't miss it much until my next visit. These leaves grow contentedly in the vegetable patch of their backyard so my mom and MIL make it all the time. I bring back a carefully wrapped box or two of home-made patrode to Singapore and eat it judiciously so that it lasts up to a week. That is the extent of my love affair with patrode!
Recently, my hubby came home grinning ear to ear with two bundles of colocasia leaves which he stumbled upon in an Indian store in Singapore. I was surprised to see them because I had assumed that you don't get it here. I was slightly apprehensive of attempting to make it myself since I had never paid much attention to the procedure when it was made at home (eating was all I was interested in 😜). I called my mom anyway and she explained to me how she makes them. I thought to myself, - "Ok, here goes nothing" and embarked on my patrode journey. An hour later, after I was done preparing it, I was afraid to even sample it. I handed it on a plate to my husband with a generous blob of butter on the side and I was intently watching his expression as he ate it. A few minutes and some contemplative expressions later, he announced that he could not tell the difference between the one his mom makes and the one I had just made. That was the biggest compliment I could ever get (the guy is blessed with seriously discerning taste buds).
Recently, my hubby came home grinning ear to ear with two bundles of colocasia leaves which he stumbled upon in an Indian store in Singapore. I was surprised to see them because I had assumed that you don't get it here. I was slightly apprehensive of attempting to make it myself since I had never paid much attention to the procedure when it was made at home (eating was all I was interested in 😜). I called my mom anyway and she explained to me how she makes them. I thought to myself, - "Ok, here goes nothing" and embarked on my patrode journey. An hour later, after I was done preparing it, I was afraid to even sample it. I handed it on a plate to my husband with a generous blob of butter on the side and I was intently watching his expression as he ate it. A few minutes and some contemplative expressions later, he announced that he could not tell the difference between the one his mom makes and the one I had just made. That was the biggest compliment I could ever get (the guy is blessed with seriously discerning taste buds).
There are different ways to make patrode. It can be steamed, shallow fried or made into a stir-fry or gravy but the shallow fried way is the one and only way I like it. I don't know why I've never taken much of a liking to the other versions of it.
Anyway, here is the step-by-step preparation for the shallow-fried version of patrode. I'm sure you will love it.
Cooking time: 20 mins
Serves: 2-3
Recipe category: Snack or appetizer/Indian
Recipe level: Intermediate
Recipe source: My amma 😊
Ingredients:
12-14 colocasia/taro
1 cup raw rice
3/4 tsp fenugreek/methi seeds
½ cup grated coconut
3 tbsp urad dal
2 tsp coriander seeds
1 tsp cumin seeds/jeera
a pinch of turmeric powder/haldi
1 small lime-sized tamarind pulp
1 tbsp jaggery
6-8 dry red chillies (adjust according to taste)
Salt to taste (I used 1 tsp)
A few tsps of coconut oil
Method:
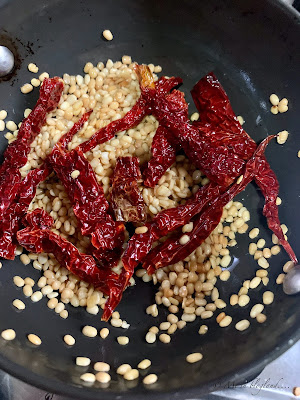
2. In 2 tsp of coconut oil, fry the urad dal and dry red chillies till the dal turns light brown. Keep aside to cool. Grind the grated coconut, coriander seeds, cumin seeds, jaggery, turmeric powder, tamarind pulp, salt, urad dal and dry red chillies with a little water to a smooth paste.
3. Next mix in the raw rice and fenugreek seeds with water and continue to grind until the mixture forms a medium paste. The consistency and texture of the batter should be as that of idli batter.
References:
http://en.wikipedia.org/wiki/Colocasia_esculenta
4. Take the colocasia leaves, wash them thoroughly under running water several times and pat them dry with a tissue or kitchen towel. Arrange the leaves in bundles of 6-7 in an order of size (largest to smallest).
5. Remove the thick veins of the leaves with small sharp knife or peeler. Lightly crush these veins with pestle so that rolling becomes easy. If the leaves are quite tender then there is no need to remove the veins.
6. Now pick the largest leaf and place it upside down, meaning the side where you have removed the veins is facing you. Apply thin coat of ground masala paste all over the leaf and place another leaf on top of it. Repeat the same procedure by placing 6-7 layers of leaves.
Remember to save some of the ground paste because you need it later.
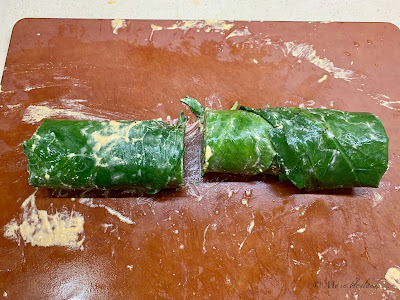
7. First fold both the edges along the length and then start rolling making sure it is tight and tuck the sides in between till you reach the end of leaf. When rolled, it will look like swiss-rolls.
FYI, this is messy business folks.
8. Smear the rolls on the outside with more of the ground paste, place them in a pressure cooker and cook for 1-2 whistles on a medium flame. Once cooked, leave it in steamer for at least 15 minutes before slicing them.
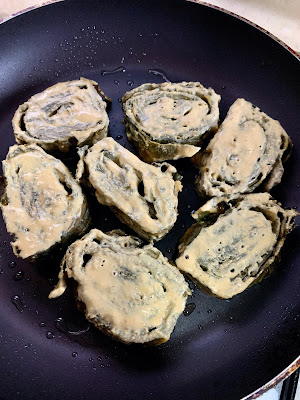
9. Once it is slightly cooled down, take a sharp knife and slice them into ½ inch slices (I know it looks a little messy but once you fry the slices, they hold their shape). Apply more of the ground paste on the top and bottom cut surfaces i.e. the surfaces that are to be placed on the tawa.
10. Heat a tawa/griddle and spread a tbsp of coconut oil, vegetable oil or ghee on it. Place patrode slices on tawa and fry on low flame till the sides turn crisp and golden brown. Cook the patrode long and slow to make sure it is cooked all the way through. With this dish you have to keep in mind that patience is a virtue.
Notes:
- One should take care to ensure that patrode is cooked thoroughly. Eating partially cooked patrode may cause itching of the tongue and throat which may last for a few hours.
- Add a generous amount of tamarind, to help to reduce this problem. you can also use coconut oil or ghee on the slices to reduce the itching.
- An immediate remedy to the itching would be to drink sour buttermilk/curd immediately once the itching starts.
References:
http://en.wikipedia.org/wiki/Colocasia_esculenta
Cheers,
Megha


wah! u've outdone urself here! patrode n all...... super :)
ReplyDeleteU have a beautiful blog, Megha with some of my favourite recipes. Patrode is something I am known to my family for relish for bf, lunch and dinner. that's how much I love it :)
ReplyDeleteThanks a lot Sia! I am actually a huge fan of urs! Nange nim blog inda thumba inspiration sigathe :) It was my hubby who discovered ur blog......he is a foodie like us too. Anyway, thanks for stopping by my blog. I think u r awesome :)
ReplyDeletehi megha,
ReplyDeleteu got a very nice blog!
any special care should i take while purchasing taro leaves, big or small ones, or the dark coloured stalks, have got different reasons from different people, please suggest as i want to avoid the itching...thanks
keep up d good work!
estelle
mumbai
Hi Estelle....thanks for stopping by my blog :)
ReplyDeleteI usually prefer the bigger taro leaves because you can make good sized rolls out of them. When I buy taro, they are already pre-packed so I just say a little prayer and hope they are not the itchy variety! I've heard that if the stalks are tender the leaves will generally be of better quality. Just make sure that you add tamarind to the rice batter and you cook the leaves properly. I first steam them until they turn soft and dark green and then I shallow fry on low flame for a long time so the heat can penetrate all the way through. So far, I've never had the problem of the leaves causing itching...
Good luck!